


Filter Warranty Claims List
|
|
|
|
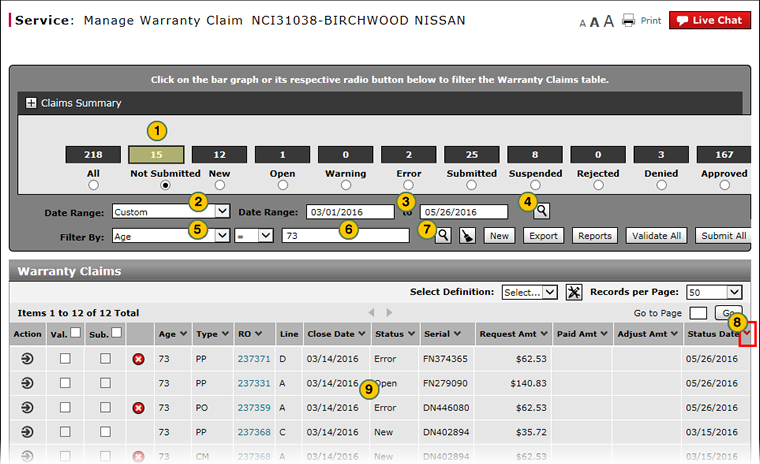
To filter the warranty claims list:
|
|
Select the desired radio button to list "All" warranty claims or those with a particular status only. |
|
|
From the Date Range drop-down list, select the warranty status date for which to display the claims. |
|
|
If you selected the "Custom" option in the step above, a second set of Date Range fields appear. In the Date Range fields, enter the date range or use the calendar to select the date range for which you want to view the warranty claims. |
|
|
If your filter criteria is complete, click the Search icon. |
|
|
To further narrow your search, from the Filter By drop-down list, select a filter option. |
|
|
As applicable, select or type secondary filter options. |
|
|
Click the Search icon to apply the filter criteria entered, or click the Clear icon to reset the filter criteria to the default options and clear the search criteria. |
|
|
To sort the warranty claims by a specific field, click the column header. |
|
|
View the claims information that meets the selected criteria. |
To filter the warranty claims list:
- Select the desired radio button to list "All" warranty claims or those with a particular status only.
Note: The default status is "Not Submitted." - From the Date Range drop-down list, select the warranty status date for the claims you want to display.
Note: The period you select will be the default period for which claims are displayed, until you change your selection. - If you selected the "Custom" option in the previous step, a second set of Date Range fields appear. In the Date Range fields, enter the date range or use the calendar to select the date range for which you want to view the warranty claims.
- If your filter criteria is complete, click the Search icon.
- To further narrow your search, from the Filter By drop-down list, select a second filter option and select or type filter criteria.
- Click the Search icon to apply all filter criteria.
- To reset the filter criteria to the default options and clear the search criteria, click the Clear icon.
- To sort the warranty claims data by a specific field, click the column header.
- About Warranty Claims: What You Need to Know
- Access the Create Warranty Claim Page
- Access the Edit Warranty Claim Page
- Batch Validate Claims from the Manage Warranty Claim Page
- Delete Warranty Claim from Manage Warranty Claims
- Display the Warranty Claims Graph
- Edit a Warranty Claim on the Express Entry Warranty Claim Page
- Edit a Warranty Claim on the Quick Entry Warranty Claim Page
- Export Warranty Claims List
- Filter and View Customer Pay Reimbursement Results
- Manage Warranty Claim Page Overview
- Manage Warranty Claims Page Basics
- Resubmit Warranty Claim
- Submit a Warranty Claim from the Manage Warranty Claim Page
- Submit All Claims from Manage Warranty Claim Page
- View DCAL
- View Repair Order from Manage Warranty Claim Page
- View Repair Order from View Warranty Claim Page
|
|
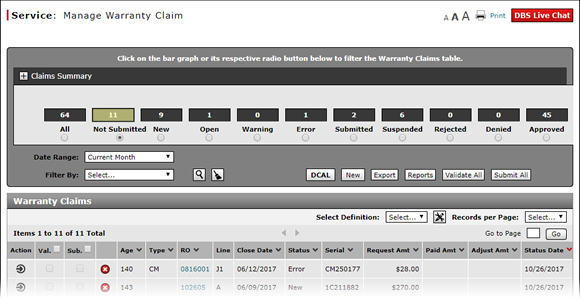
If you want to view the warranty claims for a date range, select the "Custom" option. |

Filter Warranty Claims List
|
|
|
|
To filter the warranty claims list:
|
|
Select the desired radio button to list "All" warranty claims or those with a particular status only. |
|
|
From the Date Range drop-down list, select the warranty status date for which to display the claims. |
|
|
If you selected the "Custom" option in the step above, a second set of Date Range fields appear. In the Date Range fields, enter the date range or use the calendar to select the date range for which you want to view the warranty claims. |
|
|
If your filter criteria is complete, click the Search icon. |
|
|
To further narrow your search, from the Filter By drop-down list, select a filter option. |
|
|
As applicable, select or type secondary filter options. |
|
|
Click the Search icon to apply the filter criteria entered, or click the Clear icon to reset the filter criteria to the default options and clear the search criteria. |
|
|
To sort the warranty claims by a specific field, click the column header. |
|
|
View the claims information that meets the selected criteria. |