To select filter criteria and view the customer pay reimbursement analysis results:
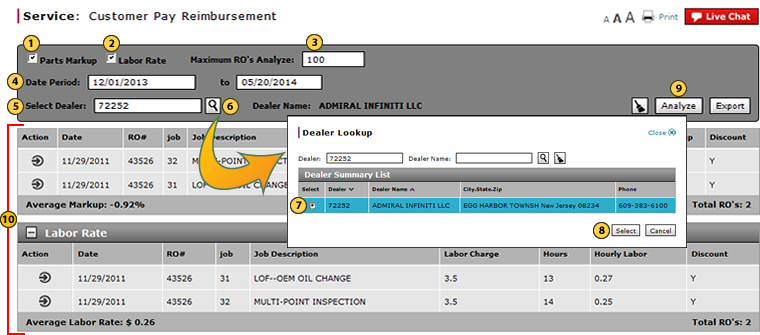
- To include parts markup data in the analysis, select the Parts Markup checkbox.
- To include labor rate data in the analysis, select the Labor Rate checkbox.
Note: You must select either this checkbox or the Parts Markup checkbox or both in order to run the analysis - In the Maximum RO's Analyze field, type the number of Repair Orders (ROs) you want to include in the analysis.
Note: The default number is 100, and this is also the maximum number allowed. - In the Date Period section, complete both date fields by clicking in the fields one at a time and using the Calendar window to choose the from and to dates that you want to use for the analysis.
Note: You cannot type directly in the date fields; instead, you must use the Calendar window that appears after you click in each field. - In the Select Dealer field, type the dealer number for which you want to conduct the analysis.
Note: If you do not know the dealer number, proceed directly to Step 6. - Click the Lookup icon.
Note: The Dealer Lookup window opens.
Note: If you entered the dealer number in Step 5, the Dealer Lookup window defaults to that dealer. Otherwise, you must perform a search for the dealer. Click here for instructions on how to use the fields in the Dealer Lookup window to find a dealer. - Select the option button for the dealer.
- Click the Select button.
Note: The Dealer Lookup window closes and the name of the dealer appears in the Dealer Name field. - Click the Analyze button.
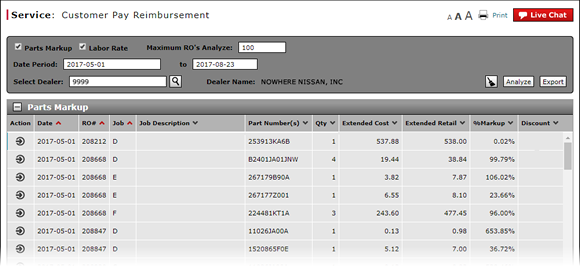
Note: DBS displays Repair Orders (ROs) that meet the criteria you selected. - View the Parts Markup and Labor Rate analysis results.
Note: The Parts Markup section lists data related to the parts markup analysis.
Note: The Labor Rate section lists data related to the labor markup analysis.
Filter and View Customer Pay Reimbursement Results
To select filter criteria and view the customer pay reimbursement analysis results:
|
|
To include parts markup data in the analysis, select the Parts Markup checkbox. |
|
|
To include labor rate data in the analysis, select the Labor Rate checkbox. |
|
|
In the Maximum RO's Analyze field, type the number of Repair Orders (ROs) you want to include in the analysis. |
|
|
In the Date Period section, complete both date fields by clicking in the fields one at a time and using the Calendar window to choose the from and to dates that you want to use for the analysis. |
|
|
In the Select Dealer field, type the dealer number for which you want to conduct the analysis. |
|
|
Click the Lookup icon. |
|
|
Select the option button for the dealer. |
|
|
Click the Select button. |
|
|
Click the Analyze button. |
|
View the Parts Markup and Labor Rate analysis results. |


