


Select Recipients by Internal User for Hierarchy Option

To select recipients by internal user for hierarchy option:
|
|
Click the Internal Users button. |
|||
|
|
Select the Choose recipients by Hierarchy option. |
|||
|
|
Click the Next button to continue. |
|||
|
|
Select a hierarchy by clicking on the box before the hierarchy.
|
|||
|
|
Click the Next button to continue, or click the Back button to return to the previous window. |
|||
|
|
From the Select Recipients by User Type drop-down list, select a user type option. |
|||
|
|
Click the Next button to continue, or click the Back button to return to the previous window. |
|||
|
|
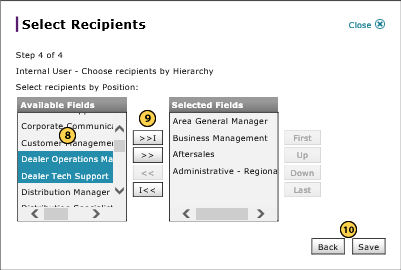
From the Available Fields box, select the positions. |
|||
|
|
Click the Copy (>>) or Copy All (>>I) button to move the selection(s) to the Selected Fields box. |
|||
|
Click the Save button to save your changes, or click the Back button to return to the previous window. |
|
|
To view your recipient selections after you select them, use the View/Print option in the Action menu. |
To select recipients by internal user for hierarchy option:
- Click the Internal User button.
- Select the Choose recipients by Hierarchy option.
- Click the Next button to continue.
- Select a hierarchy by clicking on the box before the hierarchy.
Note: To expand the hierarchy to select specific options, click the plus sign.
Note: To de-select a hierarchy, click the box to remove the check mark. - Click the Next button to continue, or click the Back button to return to the previous window.
- Select a user type.
- Click the Next button to continue, or click the Back button to return to the previous window.
- Select the positions.
Note: To select multiple items, press and hold the CTRL key while selecting items. - Click the Copy (>>) or Copy All (>>I) button to move the selection(s) to the Selected Fields list.
Note: To remove a selection from the Selected Fields list, select the option and click the Remove (<<) button. - Click the Save button to save your changes, or click the Back button to return to the previous window.
- Create or Edit a Notification
- Create or Edit Alerts Page Overview
- Create or Edit an Alert
- Create or Edit an Announcement
- Create or Edit Announcement Page Overview
- Create or Edit Calendar Event Page Overview
- Create or Edit Notifications Page Overview
- Select Recipients by Dealer User for Geography Option
- Select Recipients by Dealer User for Hierarchy Option
- Select Recipients by Dealer User for Input a Dealer Number Option
- Select Recipients by Internal User for Geography Option
- Select Trade Dealer User Recipients
|
|
To view your recipient selections after you select them, use the View/Print option in the Action menu. |
Select Recipients by Internal User for Hierarchy Option
To select recipients by internal user for hierarchy option:
|
|
Click the Internal Users button. |
|||
|
|
Select the Choose recipients by Hierarchy option. |
|||
|
|
Click the Next button to continue. |
|||
|
|
Select a hierarchy by clicking on the box before the hierarchy.
|
|||
|
|
Click the Next button to continue, or click the Back button to return to the previous window. |
|||
|
|
From the Select Recipients by User Type drop-down list, select a user type option. |
|||
|
|
Click the Next button to continue, or click the Back button to return to the previous window. |
|||
|
|
From the Available Fields box, select the positions. |
|||
|
|
Click the Copy (>>) or Copy All (>>I) button to move the selection(s) to the Selected Fields box. |
|||
|
Click the Save button to save your changes, or click the Back button to return to the previous window. |
|
|
To view your recipient selections after you select them, use the View/Print option in the Action menu. |