• Home
  • Sales
  • Service
  • Parts
  • Office
  • Administration
  • Search

View, Print, or Email Window Sticker from Inventory Search

  • How To
  • Step by Step
  • Process

View, Print, or Email Window Sticker from the Inventory Search Page

Tip

You must have Adobe® Reader® (.pdf) installed on your computer to view the window sticker.

Tip

Nissan Canada, Inc. (NCI) refers to the window sticker as the vehicle pricing sticker.

To view, print, or email the window sticker from the Vehicle Inventory page:

Invent

n1

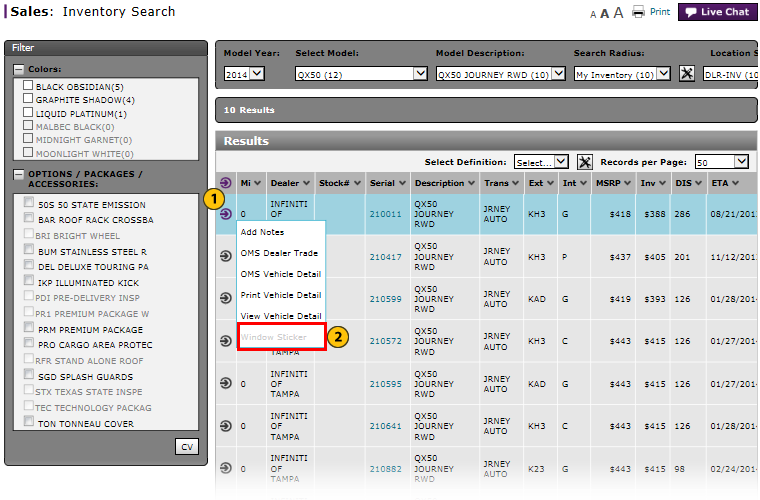
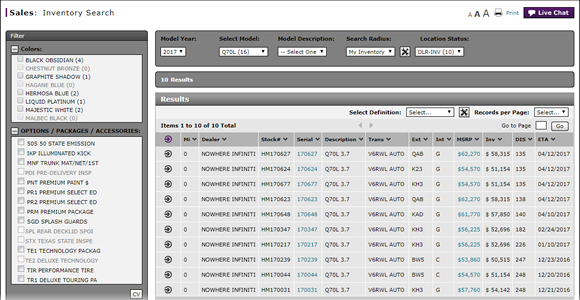
Move your mouse pointer over the Action icon for the selected vehicle.

n2

From the Action menu, select the Window Sticker option.

n3

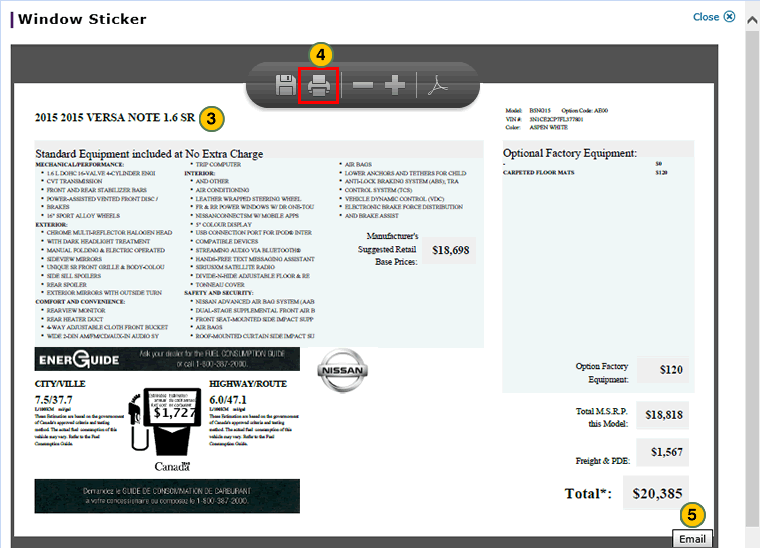
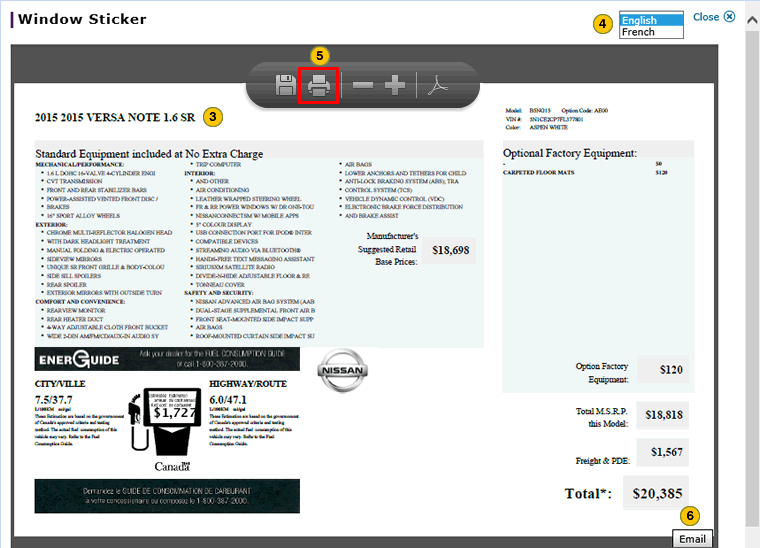
View the window sticker.
Note: To print the window sticker, click the Printer icon available in the toolbar. Proceed as you normally would to print a file.

n4

To email the window sticker, click the Email button at the lower-right of the window sticker.
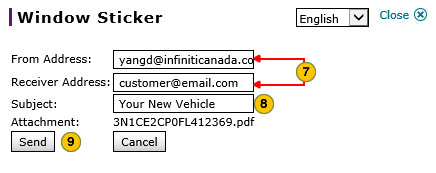
Note: A window opens for you to address the email.

n5

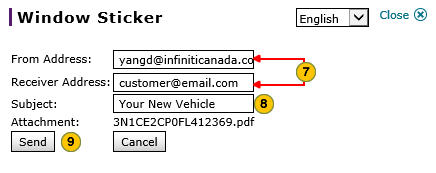
In the Receiver Address field, type the recipient's email address.

n6

Type a subject in the Subject field.

n7

Click the Send button.

n1

Move your mouse pointer over the Action icon for the selected vehicle.

n2

From the Action menu, select the Window Sticker option.

n3

View the window sticker.

n4

Select the desired language from the drop-down list. 

n5

Click the Printer icon to print the window sticker if required.

n6

To email the window sticker, click the Email button at the lower-right corner of the window sticker.
Note: A window opens for you to address the email.

n7

Type the sender's email address in the From Address and in the Receiver Address type the recipients' email addresses.  

n8

In the Subject field, type a subject for the email.

n9

Click the Send button.

View, Print, or Email Window Sticker from Inventory Search

  • How To
  • Step by Step
  • Process

Inventory

View, Print, or Email Window Sticker from Inventory Search

To view, print, or email Window Sticker from the Inventory Search page:

Note: The Window Sticker is also referred to as Vehicle Pricing Sticker by Nissan Canada, Inc. (NCI).

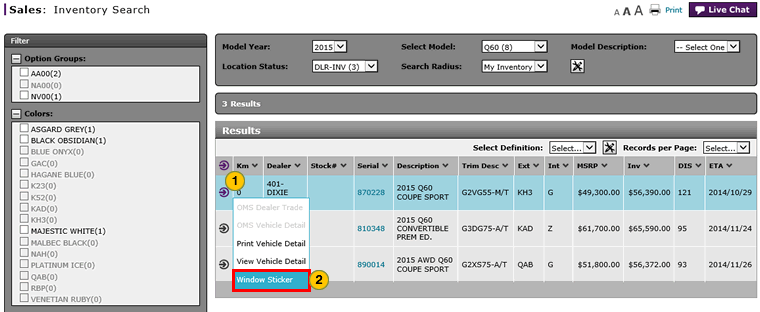
  1. Conduct an inventory search.
  2. Select a vehicle.
  3. From the Action Menu, select the Window Sticker option.
  4. View the the Window Sticker.
  5. To print the Window Sticker, click the Print icon.
  6. To email the Window Sticker, click the Email button at the bottom of the Window Sticker.
    Note: A window opens for you to address the email.
  7. Type the recipient's email address in the Receiver Address field.
  8. Type a subject in the Subject field.
  9. Click the Send button.

  • Access OMS from Inventory Search to View Vehicle Detail or Dealer Trade
  • Inventory Search Page Overview
  • Manage Vehicle Notes from Inventory Search
  • Perform Common DBS Tasks
  • Print Information
  • Search Inventory
  • Set a Custom Search Group
  • Set the Distance Search Range
  • Use the Sales Menu
  • View, Print, or Email Window Sticker from Vehicle Inventory

Warning

You must have Adobe® Reader® (.pdf) installed on your computer to view the Window Sticker.

Tip

Use the standard functionality available in Adobe® Reader® (.pdf) to print or email the Window Sticker.

View, Print, or Email Window Sticker from the Inventory Search Page

Tip

You must have Adobe® Reader® (.pdf) installed on your computer to view the window sticker.

Tip

Nissan Canada, Inc. (NCI) refers to the window sticker as the vehicle pricing sticker.

To view, print, or email the window sticker from the Vehicle Inventory page:

Invent

n1

Move your mouse pointer over the Action icon for the selected vehicle.

n2

From the Action menu, select the Window Sticker option.

n3

View the window sticker.
Note: To print the window sticker, click the Printer icon available in the toolbar. Proceed as you normally would to print a file.

n4

To email the window sticker, click the Email button at the lower-right of the window sticker.
Note: A window opens for you to address the email.

n5

In the Receiver Address field, type the recipient's email address.

n6

Type a subject in the Subject field.

n7

Click the Send button.

n1

Move your mouse pointer over the Action icon for the selected vehicle.

n2

From the Action menu, select the Window Sticker option.

n3

View the window sticker.

n4

Select the desired language from the drop-down list. 

n5

Click the Printer icon to print the window sticker if required.

n6

To email the window sticker, click the Email button at the lower-right corner of the window sticker.
Note: A window opens for you to address the email.

n7

Type the sender's email address in the From Address and in the Receiver Address type the recipients' email addresses.  

n8

In the Subject field, type a subject for the email.

n9

Click the Send button.

  • Back
  • Forward
  • Home
  • Help
  • Print document