


Set Custom Search Group
|
|
|
|
To set a custom search group:
|
|
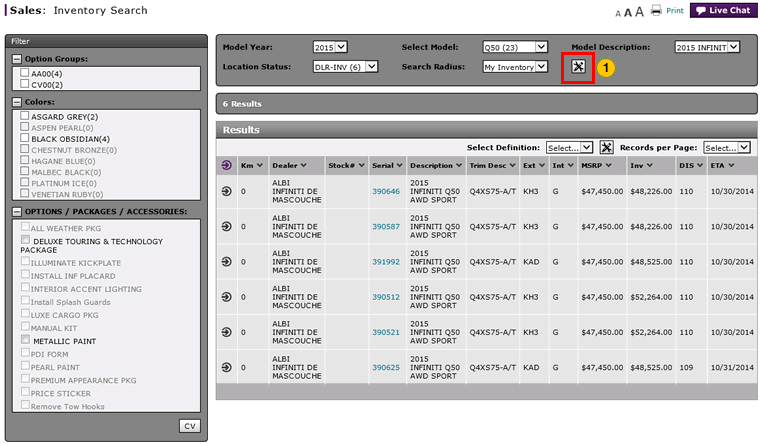
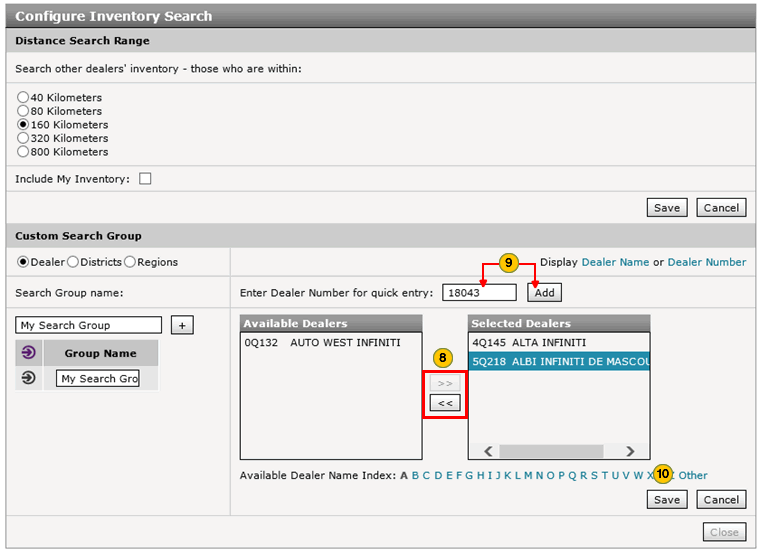
Click the Customize icon to open the Configure Inventory Search page. |
|||
|
|
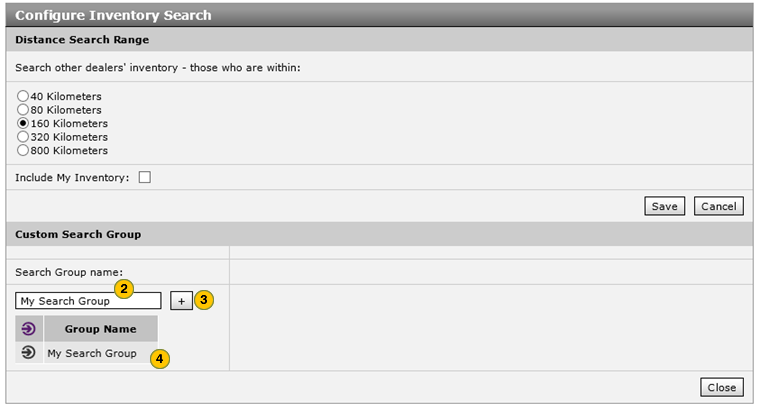
Type desired search group name in the Search Group name field.
|
|||
|
|
Click the + button to add the desired group name to the Search Group name box. |
|||
|
|
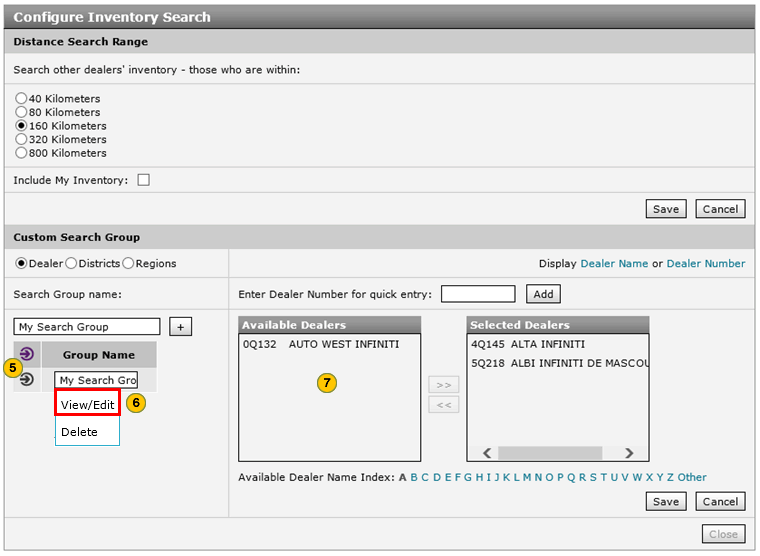
Select a custom search group name to create a customized search group. |
|||
|
|
From the Action menu, click on the desired group name.
|
|||
|
|
Select View/Edit to view or change the group name. Select Delete to remove the group. |
|||
|
|
From the Available Dealers list, select the dealers to include in your custom search group.
|
|||
|
|
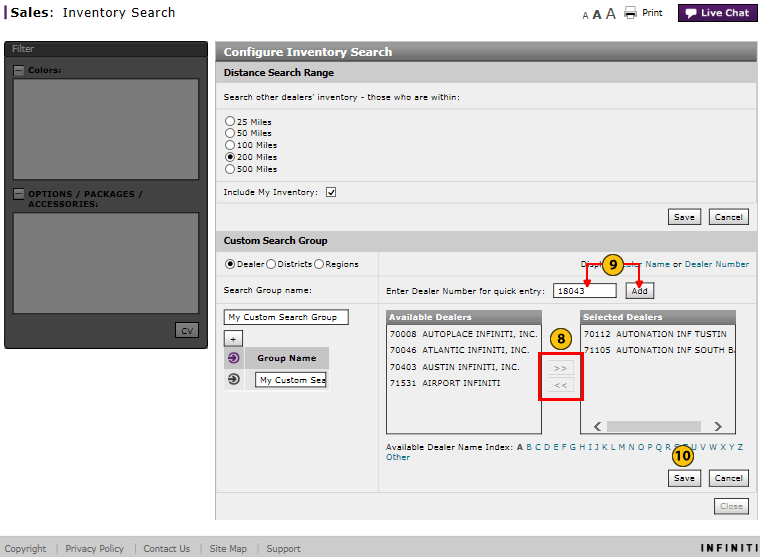
Click the Add button to add the available dealer to the Selected Dealers list. To remove a selected dealer, highlight the dealer and click the Remove button to remove the dealer from the Selected Dealers list. |
|||
|
|
In the Enter Dealer Number for quick entry field, type the desired dealer number, and then click the Add button to add a dealer directly to the Selected Dealers list. |
|||
|
Click the Save button to save your changes, or click the Cancel button to close without saving. |
|
|
|
|
|
To remove a custom search group, remove all the dealers from the Selected Dealers list, delete the custom group name, and then click the Save button. |
To set a custom search group:
- Click the Customize icon to open the Configure Inventory Search page.
- Type a search group name in the Search Group name field.
Note: You can create up to 10 custom search group names. - Click the + button to add the group name to the Search Group name box.
- From the Action menu, click on the desired group name.
- Select View/Edit to view or change the group name, or select Delete to remove the group.
- From the Available Dealers list, select the dealers to include in your custom search group.
Note: To select multiple items, press and hold the CTRL key while selecting items.
Click the Add button to add the available dealer to the Selected Dealers list. To remove a selected dealer, highlight the dealer and click the Remove button to remove the dealer from the Selected Dealers list. - In the Enter Dealer Number for quick entry field, type the desired dealer number, and then click the Add button to add a dealer directly to the Selected Dealers list.
- Click the Save button to save your changes, or click the Cancel button to close without saving.
Note: You can add a maximum of 20 dealers to the custom search group.
- Access OMS from Inventory Search to View Vehicle Detail or Dealer Trade
- Access OMS to Trade a Vehicle from Inventory Search
- Access OMS to View OMS Vehicle Detail from Inventory Search
- Inventory Search Page Overview
- Manage Vehicle Notes from Inventory Search
- Perform Common DBS Tasks
- Search Inventory
- Set the Distance Search Range
- View, Print, or Email Window Sticker from Inventory Search
|
|
You can add a maximum of 20 dealers to the custom search group. |
|
|
The option to change the search radius is available only after you have performed an inventory search. |
Set Custom Search Group
|
|
|
|
To set a custom search group:
|
|
Click the Customize icon to open the Configure Inventory Search page. |
|||
|
|
Type desired search group name in the Search Group name field.
|
|||
|
|
Click the + button to add the desired group name to the Search Group name box. |
|||
|
|
Select a custom search group name to create a customized search group. |
|||
|
|
From the Action menu, click on the desired group name.
|
|||
|
|
Select View/Edit to view or change the group name. Select Delete to remove the group. |
|||
|
|
From the Available Dealers list, select the dealers to include in your custom search group.
|
|||
|
|
Click the Add button to add the available dealer to the Selected Dealers list. To remove a selected dealer, highlight the dealer and click the Remove button to remove the dealer from the Selected Dealers list. |
|||
|
|
In the Enter Dealer Number for quick entry field, type the desired dealer number, and then click the Add button to add a dealer directly to the Selected Dealers list. |
|||
|
Click the Save button to save your changes, or click the Cancel button to close without saving. |
|
|
|
|
|
To remove a custom search group, remove all the dealers from the Selected Dealers list, delete the custom group name, and then click the Save button. |