


Complete the Claim Information Section of an Express Entry Warranty Claim
To complete the Claim Information section of an express entry warranty claim:
Note: If you search for a repair order and line number, the information in the Claim Information section is populated with the repair order information. Add additional information as necessary.
|
|
In the Open Date field, use the calendar to select the date the repair order was opened. |
|
|
In the Close Date field, use the calendar to select the date the repair order was completed. |
|
|
In the Line Type field, type a claim type code. |
|
|
In the Coverage field, type a coverage code. |
|
|
In the Symptom field, type the symptom code that describes what the customer says is wrong with the vehicle. |
|
|
In the Diagnosis field, type the diagnosis code that identifies what the technician found wrong with the vehicle during diagnosis. |
|
|
From the Advisor drop-down list, select a service consultant name. |
|
|
If the warranty claim is related to a service campaign, in the ID field, type the campaign claim identification number. |
|
|
In the Sales Tax area, in the Requested Amount field, type the requested sales tax amount. |
|
If the part is under warranty, select the Part Warranty checkbox. |
|
|
If you selected the Part Warranty checkbox, complete the Document (Invoice) Number, Odometer, and Date fields. |
|
|
If the vehicle was purchased in one country but is being serviced in another country, complete the fields in the Foreign Vehicle section. |
|
|
In the Deductible area, in the Requested Amount column, type the requested deductible amount in the CP (Customer Pay) and/or DI (Dealer Internal) pay fields. |
Note: To save a claim with errors or warnings, click the Save button. To validate the information in the claim, click the Validate button. To submit a claim with no errors, click the Submit button.
Warranty Claim Actions - express
Take Action on an Express Entry Warranty Claim

When you have entered warranty claim data, take action on an express entry warranty claim:
|
|
To delete a saved claim, click the Delete button. |
|
|
To cancel a claim after data has been validated, click the Cancel button. |
|
|
To save a claim in progress or a claim with errors, click the Save button. |
|
|
To validate claim entries, click the Validate button. |
|
|
To send the claim to the batch validation queue, click the Batch Validate button. |
|
|
To submit a validated claim with no errors, click the Submit button. |
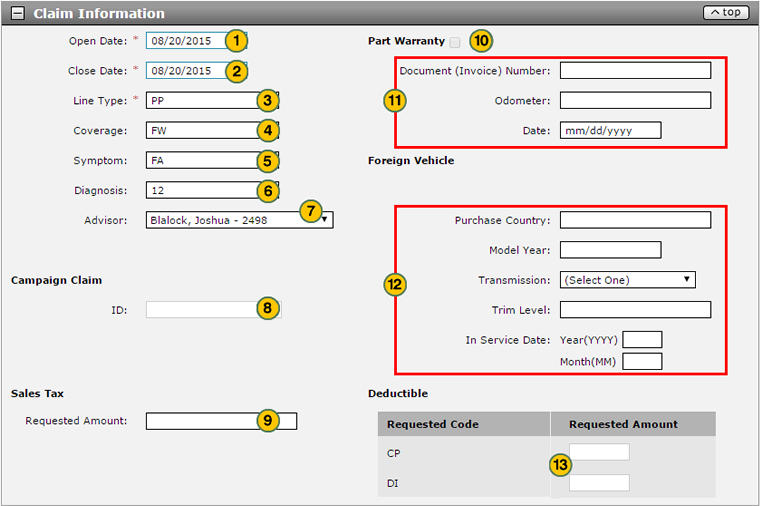
To complete the Claim Information section of an express entry warranty claim:
Note: If you search for a repair order and line number, the information in the Claim Information section is populated with the repair order information. Add additional information as necessary.
- In the Open Date field, use the calendar to select the date the repair order was opened.
- In the Close Date field, use the calendar to select the date the repair order was completed.
- In the Line Type field, type a claim type code.
Note: Based on the claim type you select, some fields are dimmed and unavailable. - In the Coverage field, type a coverage code.
- In the Symptom field, type the symptom code that describes what the customer says is wrong with the vehicle.
Note: The symptom code is used only for the "PP" and "PO" claim types. -
In the Diagnosis field, type the diagnosis code that identifies what the technician found wrong with the vehicle during diagnosis.
Note: The diagnosis code is used only for the "PP" and "PO" claim types. - From the Advisor drop-down list, select a service consultant name.
- If the warranty claim is related to a service campaign, in the ID field, type the campaign claim identification number.
Note: the campaign claim ID is only used for the "CM" line type.
Note: A campaign claim is submitted at the completion of a service or recall campaign-related repair. If the campaign ID is invalid, DBS displays an error message. - In the Sales Tax area, in the Requested Amount field, type the requested sales tax amount.
- If the part is under warranty, select the Part Warranty checkbox.
- If you selected the Part Warranty checkbox, complete the Document (Invoice) Number, Odometer, and Date fields.
- If the vehicle was purchased in one country but is being serviced in another country, complete the fields in the Foreign Vehicle section.
- In the Deductible area, in the Requested Amount column, type the requested deductible amount in the CP (Customer Pay) and/or DI (Dealer Internal) pay fields.
Note: This area is only available if you selected the "SC" coverage code for the "PP" claim type.
Note: To save a claim with errors or warnings, click the Save button. To validate the information in the claim, click the Validate button. To submit a claim with no errors, click the Submit button.
- Complete the Comments Section of an Express Entry Warranty Claim
- Complete the Customer Section of an Express Entry Warranty Claim
- Complete the Expenses Section of an Express Entry Warranty Claim
- Complete the Operations Section of an Express Entry Warranty Claim
- Complete the Parts Section of an Express Entry Warranty Claim
- Express Entry Warranty Claim Page Overview
Complete the Claim Information Section of an Express Entry Warranty Claim
To complete the Claim Information section of an express entry warranty claim:
Note: If you search for a repair order and line number, the information in the Claim Information section is populated with the repair order information. Add additional information as necessary.
|
|
In the Open Date field, use the calendar to select the date the repair order was opened. |
|
|
In the Close Date field, use the calendar to select the date the repair order was completed. |
|
|
In the Line Type field, type a claim type code. |
|
|
In the Coverage field, type a coverage code. |
|
|
In the Symptom field, type the symptom code that describes what the customer says is wrong with the vehicle. |
|
|
In the Diagnosis field, type the diagnosis code that identifies what the technician found wrong with the vehicle during diagnosis. |
|
|
From the Advisor drop-down list, select a service consultant name. |
|
|
If the warranty claim is related to a service campaign, in the ID field, type the campaign claim identification number. |
|
|
In the Sales Tax area, in the Requested Amount field, type the requested sales tax amount. |
|
If the part is under warranty, select the Part Warranty checkbox. |
|
|
If you selected the Part Warranty checkbox, complete the Document (Invoice) Number, Odometer, and Date fields. |
|
|
If the vehicle was purchased in one country but is being serviced in another country, complete the fields in the Foreign Vehicle section. |
|
|
In the Deductible area, in the Requested Amount column, type the requested deductible amount in the CP (Customer Pay) and/or DI (Dealer Internal) pay fields. |
Note: To save a claim with errors or warnings, click the Save button. To validate the information in the claim, click the Validate button. To submit a claim with no errors, click the Submit button.
Warranty Claim Actions - express
Take Action on an Express Entry Warranty Claim
When you have entered warranty claim data, take action on an express entry warranty claim:
|
|
To delete a saved claim, click the Delete button. |
|
|
To cancel a claim after data has been validated, click the Cancel button. |
|
|
To save a claim in progress or a claim with errors, click the Save button. |
|
|
To validate claim entries, click the Validate button. |
|
|
To send the claim to the batch validation queue, click the Batch Validate button. |
|
|
To submit a validated claim with no errors, click the Submit button. |