


Complete the Customer Section of an Express Entry Warranty Claim
|
To complete the Customer section of an express entry warranty claim: Note: If you search for a repair order and line number, the information in the Customer section is populated with the repair order information. Add additional information as necessary.
|
|
To complete the Customer section of an express entry warranty claim: Note: If you search for a repair order and line number, the information in the Customer section is populated with the repair order information. Add additional information as necessary.
|
Warranty Claim Actions - express
Take Action on an Express Entry Warranty Claim

When you have entered warranty claim data, take action on an express entry warranty claim:
|
|
To delete a saved claim, click the Delete button. |
|
|
To cancel a claim after data has been validated, click the Cancel button. |
|
|
To save a claim in progress or a claim with errors, click the Save button. |
|
|
To validate claim entries, click the Validate button. |
|
|
To send the claim to the batch validation queue, click the Batch Validate button. |
|
|
To submit a validated claim with no errors, click the Submit button. |
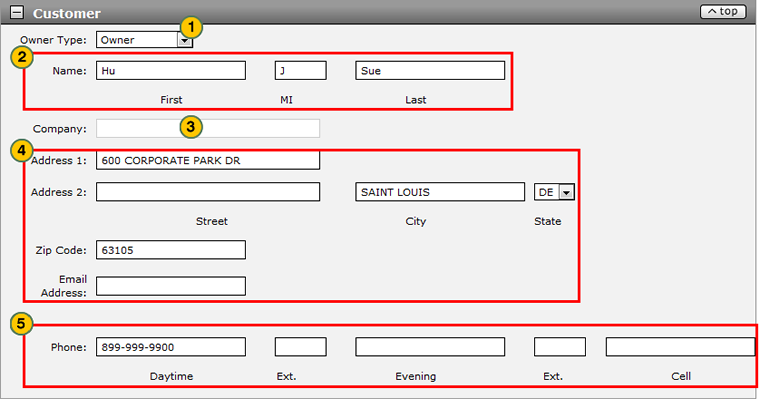
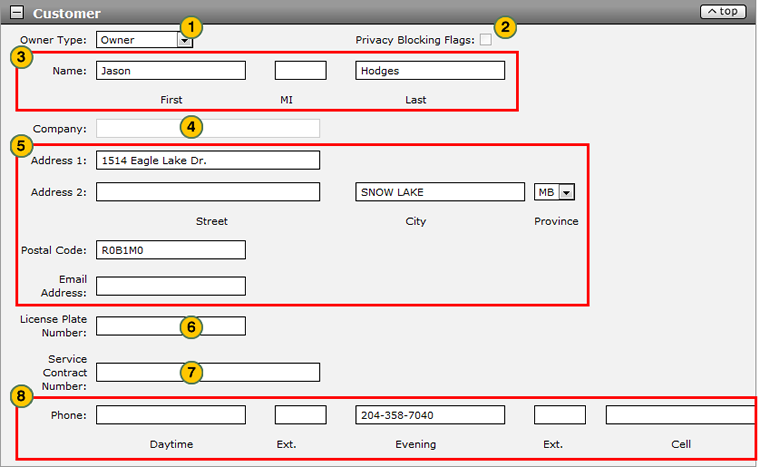
To complete the Customer section of an express entry warranty claim:
Note: If you search for a repair order and line number, the information in the Customer section is populated with the repair order information. Add additional information as necessary.
- From the Owner Type drop-down list, select an owner type.
Note: The information required to complete the Customer section varies by owner type. - In the Name fields, type the owner or principal driver's first, middle initial, and last name.
- If applicable, in the Company field, type the name of the customer's company.
- In the Address fields, type the customer's postal mail and electronic mail addresses.
- In the Phone fields, type the customer's daytime, evening, and mobile phone numbers and extensions.
Note: If you populate one of the phone number types, no additional phone numbers are required.
- Complete the Claim Information Section of an Express Entry Warranty Claim
- Complete the Comments Section of an Express Entry Warranty Claim
- Complete the Expenses Section of an Express Entry Warranty Claim
- Complete the Operations Section of an Express Entry Warranty Claim
- Complete the Parts Section of an Express Entry Warranty Claim
- Complete the Summary Section of an Express Entry Warranty Claim
- Express Entry Warranty Claim Page Overview
Complete the Customer Section of an Express Entry Warranty Claim
|
To complete the Customer section of an express entry warranty claim: Note: If you search for a repair order and line number, the information in the Customer section is populated with the repair order information. Add additional information as necessary.
|
|
To complete the Customer section of an express entry warranty claim: Note: If you search for a repair order and line number, the information in the Customer section is populated with the repair order information. Add additional information as necessary.
|
Warranty Claim Actions - express
Take Action on an Express Entry Warranty Claim
When you have entered warranty claim data, take action on an express entry warranty claim:
|
|
To delete a saved claim, click the Delete button. |
|
|
To cancel a claim after data has been validated, click the Cancel button. |
|
|
To save a claim in progress or a claim with errors, click the Save button. |
|
|
To validate claim entries, click the Validate button. |
|
|
To send the claim to the batch validation queue, click the Batch Validate button. |
|
|
To submit a validated claim with no errors, click the Submit button. |