


Create or Edit a Notification
|
|
The Notifications function is currently disabled per Nissan request. You can create and edit notifications, but they will not be sent unless the functionality is restored. |
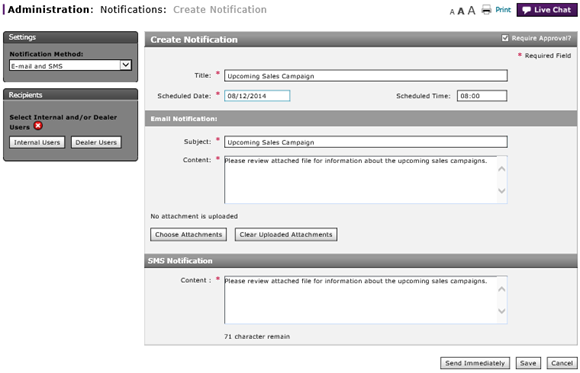
Note: Depending on the notification method selected, you will see different fields on the screen. In this example, you see all fields because e-mail and SMS is selected for the notification method.
To create or edit a notification:
|
|
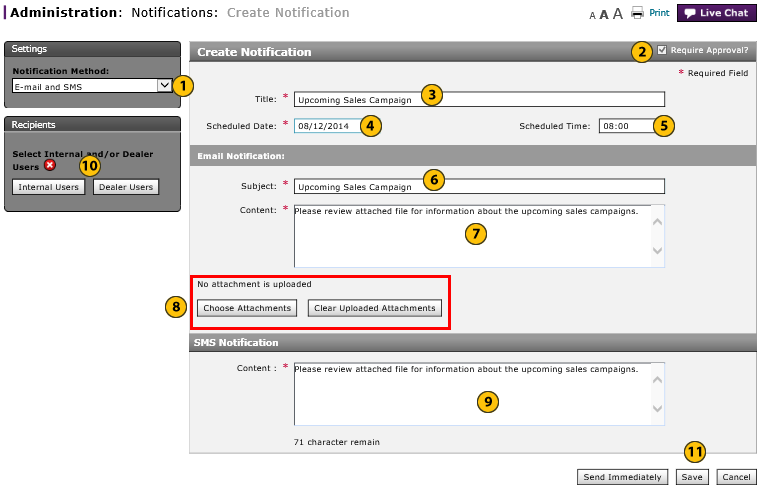
From the Notification Method drop-down list, select a notification method. |
|
|
If the item does not require approval, clear the Require Approval? checkbox. |
|
|
In the Title field, type a title for the email and SMS notification. |
|
|
In the Scheduled Date field, use the calendar to select a start date. |
|
|
If the announcement or notification must display at or after a specific time, in the Scheduled Time field, type the scheduled start time in HH:MM format. |
|
|
For email notifications, in the Subject field, type a subject. |
|
|
In the text area for your email message, type the text. |
|
|
To attach a document to an email notification, click the Choose Attachments button. |
|
|
In the text area for SMS notification message, type the text. |
|
Select recipients for the SMS notification. To select dealer users, click the Dealer User button. To select internal users, click the Internal User button. |
|
|
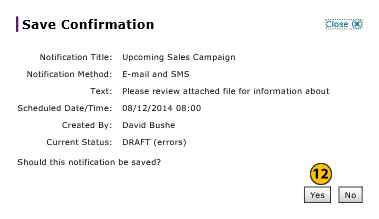
Click the Save button to save your changes, or click the Cancel button to close without saving. |
|
|
Click the Yes button to confirm, or click the No button to close the window without confirming. |
|
|
You can attach a maximum of 3 documents to an email message. The file format of an attachment must be one of the following: Microsoft® Word® (.doc or .docx), Microsoft® Excel® (.xls or .xlsx), or Adobe® Reader® (.pdf). |
|
|
For SMS notifications, a counter displays that indicates the number of remaining characters that you can enter in the text area. There is no character limit for text in email messages. |
|
|
SMS notifications are commonly known as text messages that are sent and received from mobile devices. |
|
|
Notifications cannot contain video, images, or audio. |
|
|
The Notifications function is currently disabled per Nissan request. You can create and edit notifications, but they will not be sent unless the functionality is restored. |
To create or edit a notification:
- Select a notification method from the Notification Method drop-down list.
Note: After you select a notification method, the appropriate fields appear on the page. - If the item does not require approval, clear the Require Approval? checkbox.
- Enter header information for your email or SMS notification in the Title, Scheduled Date, and Scheduled Time fields.
- For email notifications, type a subject.
- In the text area, type the content for either your email or SMS notification.
- To attach a document to an email notification, click the Choose Attachments button.
Note: To remove attached documents from an email, click the Clear Uploaded Attachments button. -
Select recipients for the announcement.
Note: Click here for more information on selecting recipients. -
Click the Save button to save your changes, or click the Cancel button to close without saving.
Note: A confirmation message appears. -
Click the Yes button to confirm, or click the No button to close the window without confirming.
- Access the Create Notification Page
- Access the Edit Notification Page
- Change the Status of a Notification
- Copy a Notification
- Create or Edit Notifications Page Overview
- Delete a Notification
- Filter the Notification Summary
- Notifications Page Overview
- Resend a Notification
- Select Recipients by Dealer User for Geography Option
- Select Recipients by Dealer User for Hierarchy Option
- Select Recipients by Dealer User for Input a Dealer Number Option
- Select Recipients by Internal User for Geography Option
- Select Recipients by Internal User for Hierarchy Option
- View Notification Summary
- View or Print Notification Detail
|
|
You can attach a maximum of 3 documents to an email message. The file format of an attachment must be one of the following: Microsoft® Word® (.doc), Microsoft® Excel® (.xls), or Adobe® Reader® (.pdf). |
|
|
For SMS notifications, a counter displays that indicates the number of remaining characters that you can enter in the text field. There is no character limit for text in email messages. |
|
|
SMS notifications are commonly called text messages that are sent and received from mobile devices. |
|
|
Notifications cannot contain videos, images, or audio. |
Create or Edit a Notification
|
|
The Notifications function is currently disabled per Nissan request. You can create and edit notifications, but they will not be sent unless the functionality is restored. |
Note: Depending on the notification method selected, you will see different fields on the screen. In this example, you see all fields because e-mail and SMS is selected for the notification method.
To create or edit a notification:
|
|
From the Notification Method drop-down list, select a notification method. |
|
|
If the item does not require approval, clear the Require Approval? checkbox. |
|
|
In the Title field, type a title for the email and SMS notification. |
|
|
In the Scheduled Date field, use the calendar to select a start date. |
|
|
If the announcement or notification must display at or after a specific time, in the Scheduled Time field, type the scheduled start time in HH:MM format. |
|
|
For email notifications, in the Subject field, type a subject. |
|
|
In the text area for your email message, type the text. |
|
|
To attach a document to an email notification, click the Choose Attachments button. |
|
|
In the text area for SMS notification message, type the text. |
|
Select recipients for the SMS notification. To select dealer users, click the Dealer User button. To select internal users, click the Internal User button. |
|
|
Click the Save button to save your changes, or click the Cancel button to close without saving. |
|
|
Click the Yes button to confirm, or click the No button to close the window without confirming. |
|
|
You can attach a maximum of 3 documents to an email message. The file format of an attachment must be one of the following: Microsoft® Word® (.doc or .docx), Microsoft® Excel® (.xls or .xlsx), or Adobe® Reader® (.pdf). |
|
|
For SMS notifications, a counter displays that indicates the number of remaining characters that you can enter in the text area. There is no character limit for text in email messages. |
|
|
SMS notifications are commonly known as text messages that are sent and received from mobile devices. |
|
|
Notifications cannot contain video, images, or audio. |