


Create or Edit an Event
 |
 |
To create or edit an event:
|
|
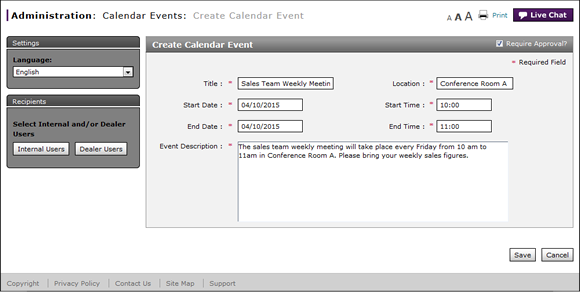
Select the display language for the event from the Language drop-down list. |
|||
|
|
If the item does not require approval, clear the Require Approval? checkbox. |
|||
|
|
In the Title field, type a title for the event. This title will display in the event calendar as a hyperlink that users can click to view the event description. |
|||
|
|
In the Location field, type the room number, building, or address where the event will take place. |
|||
|
|
Click in the Start Date field, and then use the calendar to select the desired date. |
|||
|
|
In the Start Time field, type the start time for the event in HH:MM format. |
|||
|
|
Click in the End Date field, and then use the calendar to select the desired date. |
|||
|
|
In th End Time field, type the end time for the event in HH:MM format. |
|||
|
|
Type a description for the event in the space provided. |
|||
|
To select dealer users, click the Dealer User button. To select internal users, click the Internal User button. |
||||
|
Click the Save button to save your changes, or click the Cancel button to close without saving. |
||||
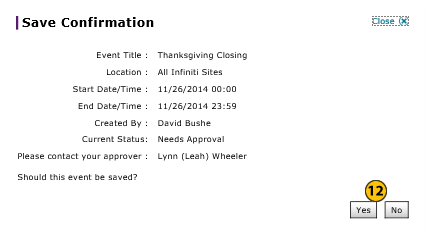
|
Click the Yes button to confirm, or click the No button to close the window without confirming.
|
To create or edit an event:
- Select the display language for the event from the Language drop-down list.
Note: The default language for events is English. - If the item does not require approval, clear the Require Approval? checkbox.
- Type a title for the event.
Note: The event title will display in the event calendar as a hyperlink that users can click to view the event description. - In the Location field, type room number, building, or address where the event will take place.
- Select a start date for the event.
- Type the scheduled start time for the event.
- Select an end date for the event.
- Type the scheduled end time for the event.
- Type a description of the event in the space provided.
- Select recipients for the event. Click here for instructions on how to select recipients.
-
Click the Save button to save your changes, or click the Cancel button to close without saving.
Note: A confirmation message appears. -
Click the Yes button to confirm, or click the No button to close the window without confirming.
Note: The event is created in "Needs Approval" status.
|
|
Time in Fred is written in the 24-hour notation, where HH (00 to 23) is the number of full hours that have passed since midnight. |

Create or Edit an Event
|
|
To create or edit an event:
|
|
Select the display language for the event from the Language drop-down list. |
|||
|
|
If the item does not require approval, clear the Require Approval? checkbox. |
|||
|
|
In the Title field, type a title for the event. This title will display in the event calendar as a hyperlink that users can click to view the event description. |
|||
|
|
In the Location field, type the room number, building, or address where the event will take place. |
|||
|
|
Click in the Start Date field, and then use the calendar to select the desired date. |
|||
|
|
In the Start Time field, type the start time for the event in HH:MM format. |
|||
|
|
Click in the End Date field, and then use the calendar to select the desired date. |
|||
|
|
In th End Time field, type the end time for the event in HH:MM format. |
|||
|
|
Type a description for the event in the space provided. |
|||
|
To select dealer users, click the Dealer User button. To select internal users, click the Internal User button. |
||||
|
Click the Save button to save your changes, or click the Cancel button to close without saving. |
||||
|
Click the Yes button to confirm, or click the No button to close the window without confirming.
|