


Complete the Parts Section of a Claim
|
|
 |
To complete the Parts section of a warranty claim.
|
|
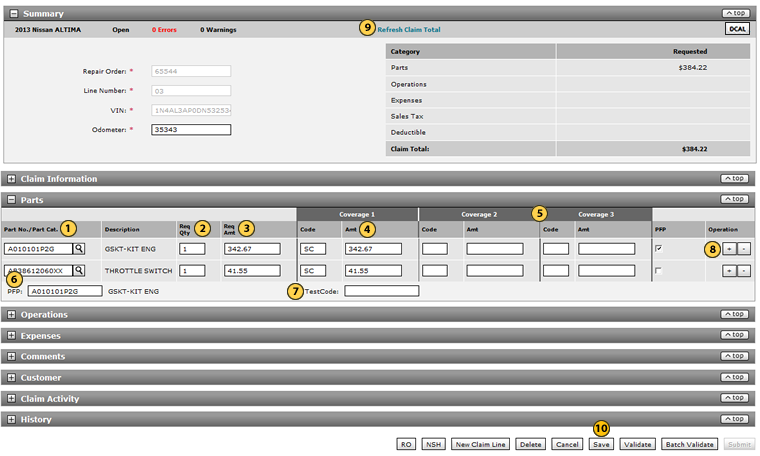
In the Part No./Part Cat. field, type the part number or a three-digit part category code. If you don't know the part number, click the Lookup icon to perform a search. |
|
|
In the Req Qty field, type the quantity requested for the repair part. |
|
|
In the Req Amt field, type the monetary amount requested for the part. |
|
|
If necessary, in the Coverage 1 Code field, update the coverage code. |
|
|
If the coverage amount is split between or among coverage types, complete the Coverage 2 Amt and Coverage 3 Amt fields as appropriate. |
|
|
If you entered line type "PP" in the Claim Information section, in the PFP (Primary Failed Part) field, you must enter a part number. |
|
|
If the primary failed part is a battery, alternator, or starter replacement parts, complete the TestCode field. |
|
|
As appropriate, click the Plus Sign to add additional parts. |
|
|
To update the claim total to reflect the information you entered, in the Summary section at the top of the page, click the Refresh Claim Total link. |
|
To save the information, click the Save button at the bottom-right of the page. |
To complete the Parts section of a warranty claim.
- In the Part No./Part Cat. field, type the part number or a three-digit part category code. If you don't know the part number, click the Lookup icon to perform a search. Click here for instructions on how to search for a part number.
Note: Use the three-digit part category code if you have a locally purchased part, such as a windshield wiper. - In the Req Qty field, type the quantity requested for the repair part.
- In the Req Amt field, type the monetary amount requested for the part.
- If necessary, in the Coverage 1 Code field, update the coverage code.
Note: The coverage code is automatically populated based on information entered in the Claim Information section. - If the coverage amount is split between or among coverage types, complete the Coverage 2 Amt and Coverage 3 Amt fields as appropriate.
Note: The payment amounts split among the coverage amount fields must be equal to the requested amount. - If you entered line type "PP" in the Claim Information section, in the PFP (Primary Failed Part) field, you must enter a part number.
Note: If you select the PFP checkbox, the PFP field will be auto-populated. - If the primary failed part is a battery, alternator, or starter replacement parts, complete the TestCode field.
Note: The test code is the same as the GR8 code. - As appropriate, click the Plus Sign to add additional parts.
- To update the claim total to reflect the information you entered, in the Summary section at the top of the page, click the Refresh Claim Total link.
- To save the information, click the Save button at the bottom-right of the page.
- Batch Validate a Warranty Claim
- Complete the Claim Information Section of a Claim
- Complete the Customer Section of a Claim
- Complete the Expenses Section of a Claim
- Complete the Operations Section of a Claim
- Complete the Summary Section of a Claim
- Edit or Create Warranty Claim Page Overview
- Look Up an Operation Code
- Print a Warranty Claim
- Quick Entry Warranty Claim Page Overview
- Submit a Warranty Claim
- Use the Quick Jump Menu in a Warranty Claim
- View DCAL
- View NSH for a Warranty Claim
Complete the Parts Section of a Claim
|
|
|
To complete the Parts section of a warranty claim.
|
|
In the Part No./Part Cat. field, type the part number or a three-digit part category code. If you don't know the part number, click the Lookup icon to perform a search. |
|
|
In the Req Qty field, type the quantity requested for the repair part. |
|
|
In the Req Amt field, type the monetary amount requested for the part. |
|
|
If necessary, in the Coverage 1 Code field, update the coverage code. |
|
|
If the coverage amount is split between or among coverage types, complete the Coverage 2 Amt and Coverage 3 Amt fields as appropriate. |
|
|
If you entered line type "PP" in the Claim Information section, in the PFP (Primary Failed Part) field, you must enter a part number. |
|
|
If the primary failed part is a battery, alternator, or starter replacement parts, complete the TestCode field. |
|
|
As appropriate, click the Plus Sign to add additional parts. |
|
|
To update the claim total to reflect the information you entered, in the Summary section at the top of the page, click the Refresh Claim Total link. |
|
To save the information, click the Save button at the bottom-right of the page. |