


Filter and View Customer Pay Reimbursement Results
To select filter criteria and view the customer pay reimbursement analysis results:
|
|
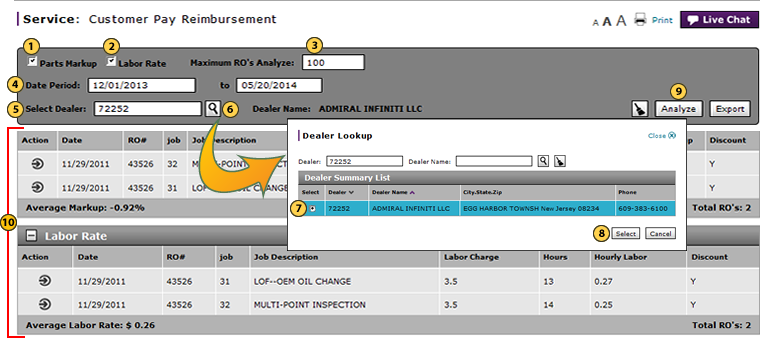
To include parts markup data in the analysis, select the Parts Markup checkbox. |
|
|
To include labor rate data in the analysis, select the Labor Rate checkbox. |
|
|
In the Maximum RO's Analyze field, type the number of repair orders (ROs) you want to include in the analysis. |
|
|
In the Date Period section, choose the from and to dates that you want to use for the analysis. |
|
|
In the Select Dealer field, type the dealer number for which you want to conduct the analysis. |
|
|
Click the Lookup icon. |
|
|
Select the option button for the dealer. |
|
|
Click the Select button. |
|
|
Click the Analyze button. |
|
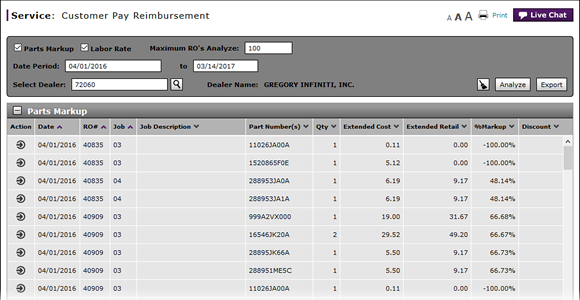
View the Parts Markup and Labor Rate analysis results. |
To select filter criteria and view the customer pay reimbursement analysis results:
- To include parts markup data in the analysis, select the Parts Markup checkbox.
- To include labor rate data in the analysis, select the Labor Rate checkbox.
Note: You must select either this checkbox or the Parts Markup checkbox or both in order to run the analysis - In the Maximum RO's Analyze field, type the number of repair orders (ROs) you want to include in the analysis.
Note: The default number is 100, and this is also the maximum number allowed. - In the Date Period section, complete both date fields.
- In the Select Dealer field, type the dealer number for which you want to conduct the analysis.
- Click the Lookup icon.
Select the option button for the dealer. - Click the Select button.
- Click the Analyze button.
- View the Parts Markup and Labor Rate analysis results.
Filter and View Customer Pay Reimbursement Results
To select filter criteria and view the customer pay reimbursement analysis results:
|
|
To include parts markup data in the analysis, select the Parts Markup checkbox. |
|
|
To include labor rate data in the analysis, select the Labor Rate checkbox. |
|
|
In the Maximum RO's Analyze field, type the number of repair orders (ROs) you want to include in the analysis. |
|
|
In the Date Period section, choose the from and to dates that you want to use for the analysis. |
|
|
In the Select Dealer field, type the dealer number for which you want to conduct the analysis. |
|
|
Click the Lookup icon. |
|
|
Select the option button for the dealer. |
|
|
Click the Select button. |
|
|
Click the Analyze button. |
|
View the Parts Markup and Labor Rate analysis results. |