


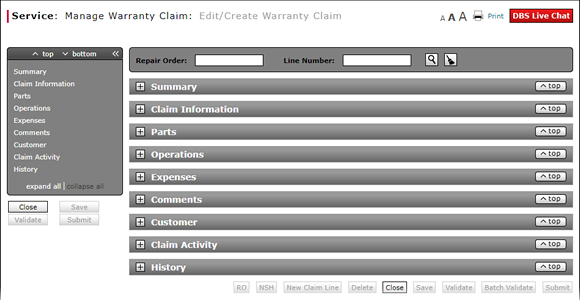
Complete the Claim Information Section of a Claim
To complete the Claim Information section of a warranty claim:
Note: If you are editing an existing claim, you may have already populated some of the fields.
|
|
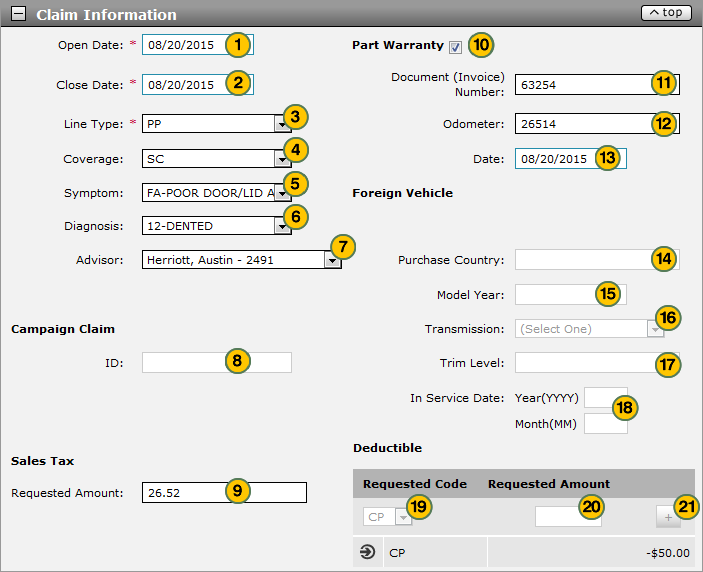
In the Open Date field, use the calendar to select the date the repair order was opened at the dealership. |
|
|
In the Close Date field, use the calendar to select the date the repair order was completed at the dealership. |
|
|
From the Line Type drop-down list, select a claim type. |
|
|
From the Coverage drop-down list, select a coverage code. |
|
|
From the Symptom drop-down list, select the symptom code which identifies what the customer said was wrong with the vehicle. |
|
|
From the Diagnosis drop-down list, select the diagnosis code which identifies what the technician found wrong with the vehicle. |
|
|
From the Advisor drop-down list, select a service consultant name. |
|
|
If the repair is being made as part of a campaign claim (claim type "CM"), in the ID field, type the campaign claim identification number. |
|
|
In the Sales Tax area, in the Requested Amount field, type the requested sales tax amount. |
|
If the part is under warranty, select the Part Warranty checkbox. |
|
|
In the Document (Invoice) Number field, type the invoice number as proof of purchase of the replacement part. |
|
|
In the Odometer field, type the odometer reading when the replacement part was purchased. |
|
|
In the Date field, type the original date the replacement part was purchased. |
|
|
If the vehicle was purchased in one country but is being serviced in another country, in the Purchase Country field, type the country name where the vehicle was purchased, then complete the next four steps; otherwise, continue with step 19. |
|
|
In the Model Year field, type the model year of the vehicle. |
|
|
From the Transmission drop-down list, select a transmission type. |
|
|
In the Trim Level field, type the trim level. |
|
|
In the In Service Date Year and Month fields, type the year and month. |
|
|
In the Deductible area, from the Requested Code drop-down list, select either "CP" (Customer Pay) or "DI" (Dealer Internal) pay. |
|
|
In the Requested Amount field, type the requested deductible amount. |
|
|
Click the Plus icon and add deductible amounts as applicable. |
|
|
DBS displays errors and warning messages in the Alerts area at the bottom of the Claim Information section. |
To complete the Claim Information section of a claim on either the Edit/Create Warranty Claim page or the Quick Entry Warranty Claim page:
Note: If you are editing an existing claim, you may have already populated some of the fields.
- In the Open Date field, use the calendar to select the date the repair order was opened at the dealership.
- In the Close Date field, use the calendar to select the date the repair order was completed at the dealership.
- From the Line Type drop-down list, select a claim type.
- From the Coverage drop-down list, select a coverage code.
- From the Symptom drop-down list, select a symptom code.
- From the Diagnosis drop-down list, select a diagnosis code.
- From the Advisor drop-down list, select a service consultant name.
- If applicable, in the Campaign Claim area, in the ID field, type the campaign claim identification number.
- In the Sales Tax area, in the Requested Amount field, type the requested sales tax amount.
- If the part is under warranty, select the Part Warranty checkbox.
- In the Document (Invoice) Number field, type the invoice number as proof of purchase of the replacement part.
- In the Odometer field, type the odometer reading when the replacement part was purchased.
- In the Date field, type the original date the replacement part was purchased.
- If the vehicle was purchased in one country but is being serviced in another country, in the Purchase Country field, type the country name where the vehicle was purchased, then complete the next four steps; otherwise, continue with Step 19.
- In the Model Year field, type the model year of the vehicle.
- From the Transmission drop-down list, select a transmission type.
- In the Trim Level field, type the trim level.
- In the In Service Date Year and Month fields, type the year and month.
- In the Deductible area, from the Requested Code drop-down list, select either "CP" (Customer Pay) or "DI" (Dealer Internal) pay.
- In the Requested Amount field, type the requested deductible amount.
- Click the Plus icon and add deductible amounts as applicable.
- Add a New Claim Line from Edit/Create Warranty Claim Page
- Add New Claim Line from Quick Entry Warranty Claim Page
- Batch Validate a Warranty Claim
- Complete the Customer Section of a Claim
- Complete the Expenses Section of a Claim
- Complete the Operations Section of a Claim
- Complete the Parts Section of a Claim
- Complete the Summary Section of a Claim
- Edit or Create Warranty Claim Page Overview
- Look Up a Part
- Look Up an Operation Code
- Print a Warranty Claim
- Quick Entry Warranty Claim Page Overview
- Submit a Warranty Claim
- Validate a Warranty Claim
- View DCAL
- View NSH for a Warranty Claim
|
|
DBS displays errors and warning messages in the Alerts area at the bottom of the Claim Information section. |
Complete the Claim Information Section of a Claim
To complete the Claim Information section of a warranty claim:
Note: If you are editing an existing claim, you may have already populated some of the fields.
|
|
In the Open Date field, use the calendar to select the date the repair order was opened at the dealership. |
|
|
In the Close Date field, use the calendar to select the date the repair order was completed at the dealership. |
|
|
From the Line Type drop-down list, select a claim type. |
|
|
From the Coverage drop-down list, select a coverage code. |
|
|
From the Symptom drop-down list, select the symptom code which identifies what the customer said was wrong with the vehicle. |
|
|
From the Diagnosis drop-down list, select the diagnosis code which identifies what the technician found wrong with the vehicle. |
|
|
From the Advisor drop-down list, select a service consultant name. |
|
|
If the repair is being made as part of a campaign claim (claim type "CM"), in the ID field, type the campaign claim identification number. |
|
|
In the Sales Tax area, in the Requested Amount field, type the requested sales tax amount. |
|
If the part is under warranty, select the Part Warranty checkbox. |
|
|
In the Document (Invoice) Number field, type the invoice number as proof of purchase of the replacement part. |
|
|
In the Odometer field, type the odometer reading when the replacement part was purchased. |
|
|
In the Date field, type the original date the replacement part was purchased. |
|
|
If the vehicle was purchased in one country but is being serviced in another country, in the Purchase Country field, type the country name where the vehicle was purchased, then complete the next four steps; otherwise, continue with step 19. |
|
|
In the Model Year field, type the model year of the vehicle. |
|
|
From the Transmission drop-down list, select a transmission type. |
|
|
In the Trim Level field, type the trim level. |
|
|
In the In Service Date Year and Month fields, type the year and month. |
|
|
In the Deductible area, from the Requested Code drop-down list, select either "CP" (Customer Pay) or "DI" (Dealer Internal) pay. |
|
|
In the Requested Amount field, type the requested deductible amount. |
|
|
Click the Plus icon and add deductible amounts as applicable. |
|
|
DBS displays errors and warning messages in the Alerts area at the bottom of the Claim Information section. |